ADVANCED GROOMING TUTORIALS
Golden Retriever
How to prepare a Golden Retriever for a Show or Comp with Allison Foley
On this page, you will find the video instructions on how to groom the Golden Retriever.
The videos contain step-by-step demonstrations of advanced methods for grooming the Golden Retriever.
The instructions and the rationale behind the methods are summarized in the e-book which you can download and print. You can use the ebook to follow along with the video tutorials if you’re a reader!
You can also download Allison’s list of equipment used here.
SETTING UP FOR SUCCESS
THE BATH
As mentioned later in the course, if your dog is very hairy, you may want to do some raking of the coat before the bath as there could be excess dander and to help you get out the excess coat (it can be harder for your tools to grab when the coat is 'squeaky-clean'.
With your products mixed and ready to go, put your Golden in the tub and quickly and efficiently get them wet from head to toe. It is actually best practice to bathe them from front to back and from top to bottom as it is the most efficient, and the water you are rinsing off is not running into previously rinsed areas.
Starting with the head, apply shampoo and continue down the dogs topline to the end of the tail tail. Be sure to shampoo the feet, underline, and sides of body as well. Work the shampoo into the hair to create lather. Try to avoid using a circular motion when lathering, and work your product through the coat from root to tip (especially with care on the long, luxurious furnishings).
If your Golden is heavily soiled or greasy, he or she may require a second shampoo.
Rinse thoroughly, again starting at the head and moving down to the tail. Apply your conditioner in the same manner as the shampoo. I tend to let the conditioner sit for about 5 minutes and then rinse.
Between the bath and dry, get rid of excess moisture!
One thing that people often miss when going from the tub to the grooming table to dry their dogs is to remove excess moisture.
Starting in the tub, squeeze as much water out of the coat as you can. Use a clean, dry towel to continue this squeezing - avoid drying in a circular motion.
Next, I like to let my Goldens shake or drip in a clean, dry area, such as a clean yard or a crate with clean towels. While they are air drying a bit, I'll set up my table with two clean dry towels (I also like to have a comfortable mat, e.g. a yoga mat).
Lastly, I'll finish removing any excess moisture with a dry towel before I get started with the hot dry. You do not need a sopping wet Golden Retriever to start the dry! However, beware of over-drying as you do need some wetness in order to properly dry the coat straight and for any styling & correction.
Further basics of Bath, Ears, Nails and Teeth are detailed further in the ebook.
THE FORCE DRY
Force drying your Golden Retriever is an important first step to drying your dog. As mentioned above, before you start force drying you want to remove as much excess water as possible by towelling your dog and letting them shake in a clean, dry space. Set up your grooming table with two clean, dry towels (to soak up all excess water) and have your styling products and tools nearby.
Overall, with force drying you are trying to get your dog 80% dry, and you will finish the last 20% of drying your dog with the hot dryer. For the first ~50% of the force dry for a Golden, you are force drying without too much worry about the styling of the coat, you are simply trying to knock out all that excess water. For the last 50% of the force dry, you are going to start styling the coat with the force dryer. Get started with force drying by using the force dryer (high velocity dryer) to knock out as much water as possible for the first 50% of the dry. Make sure you have towels on the table to soak up the excess water. Even though you don’t need to worry too much about the styling of the coat, it is helpful to dry from the top and front of your down down and back on the body. For instance, if you were starting at the croup and drying towards the tail but working in sections up towards the neck, you’re going to be pushing water into the areas you’ve already dried. Generally work from the top of the neck back towards the tail and down towards the feet.
Once you’ve dried them about 50%, take care of the direction you are drying the coat. You should start at the occiput and dry the topcoat in the direction the coat grows down toward the tail. Dry from the top of the neck down towards the chest and shoulders, again with the direction the coat grows. You can dry the coat backwards on the chest to create volume. In all four legs and feet, dry the coat backwards to create volume. For all furnishings, including the legs, generally dry them straight or create some volume if needed.
Take care on the long furnishings and the topcoat not to hold the force dryer too close, which causes the coat to turn in on itself. On the topcoat, you want to make sure you’re drying it straight and flat. On the furnishings, you run the risk of causing “whip knots” which leads to matting/tangling you will need to work out later. Get your Golden about 80% dry overall, and you’re ready to move on to the hot dryer.
THE STYLIZED DRY DIAGRAM
THE HOT DRY
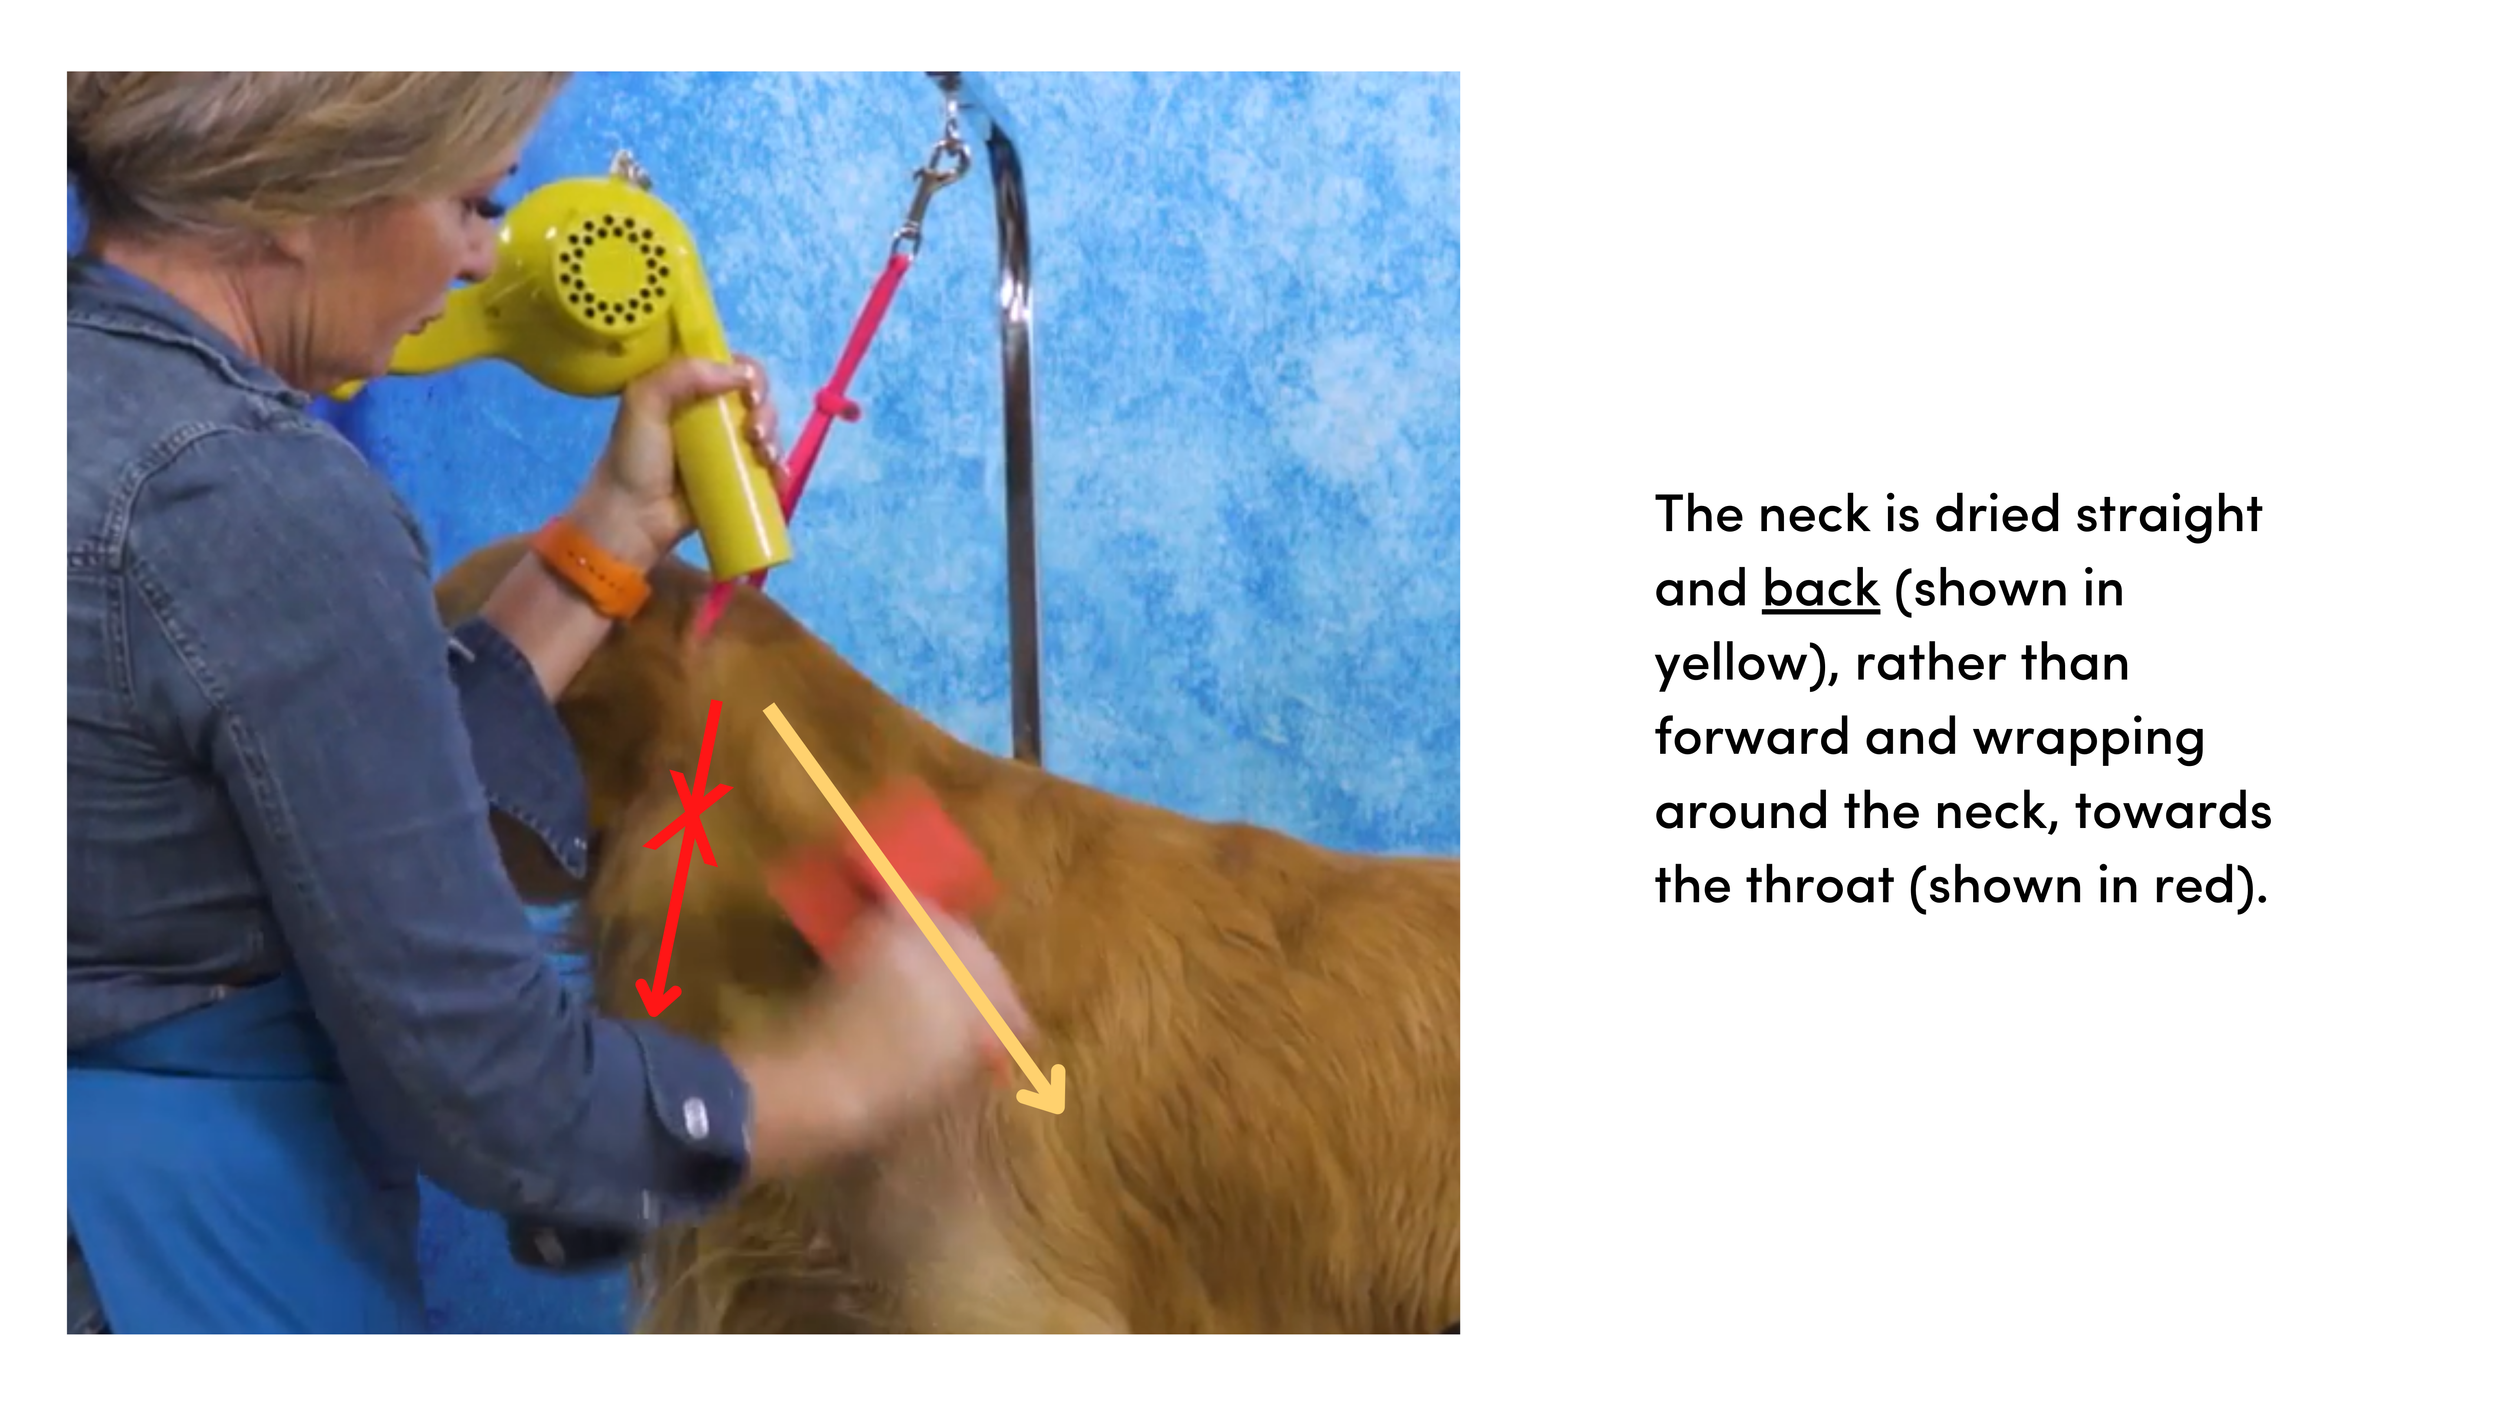
Drying the Neck
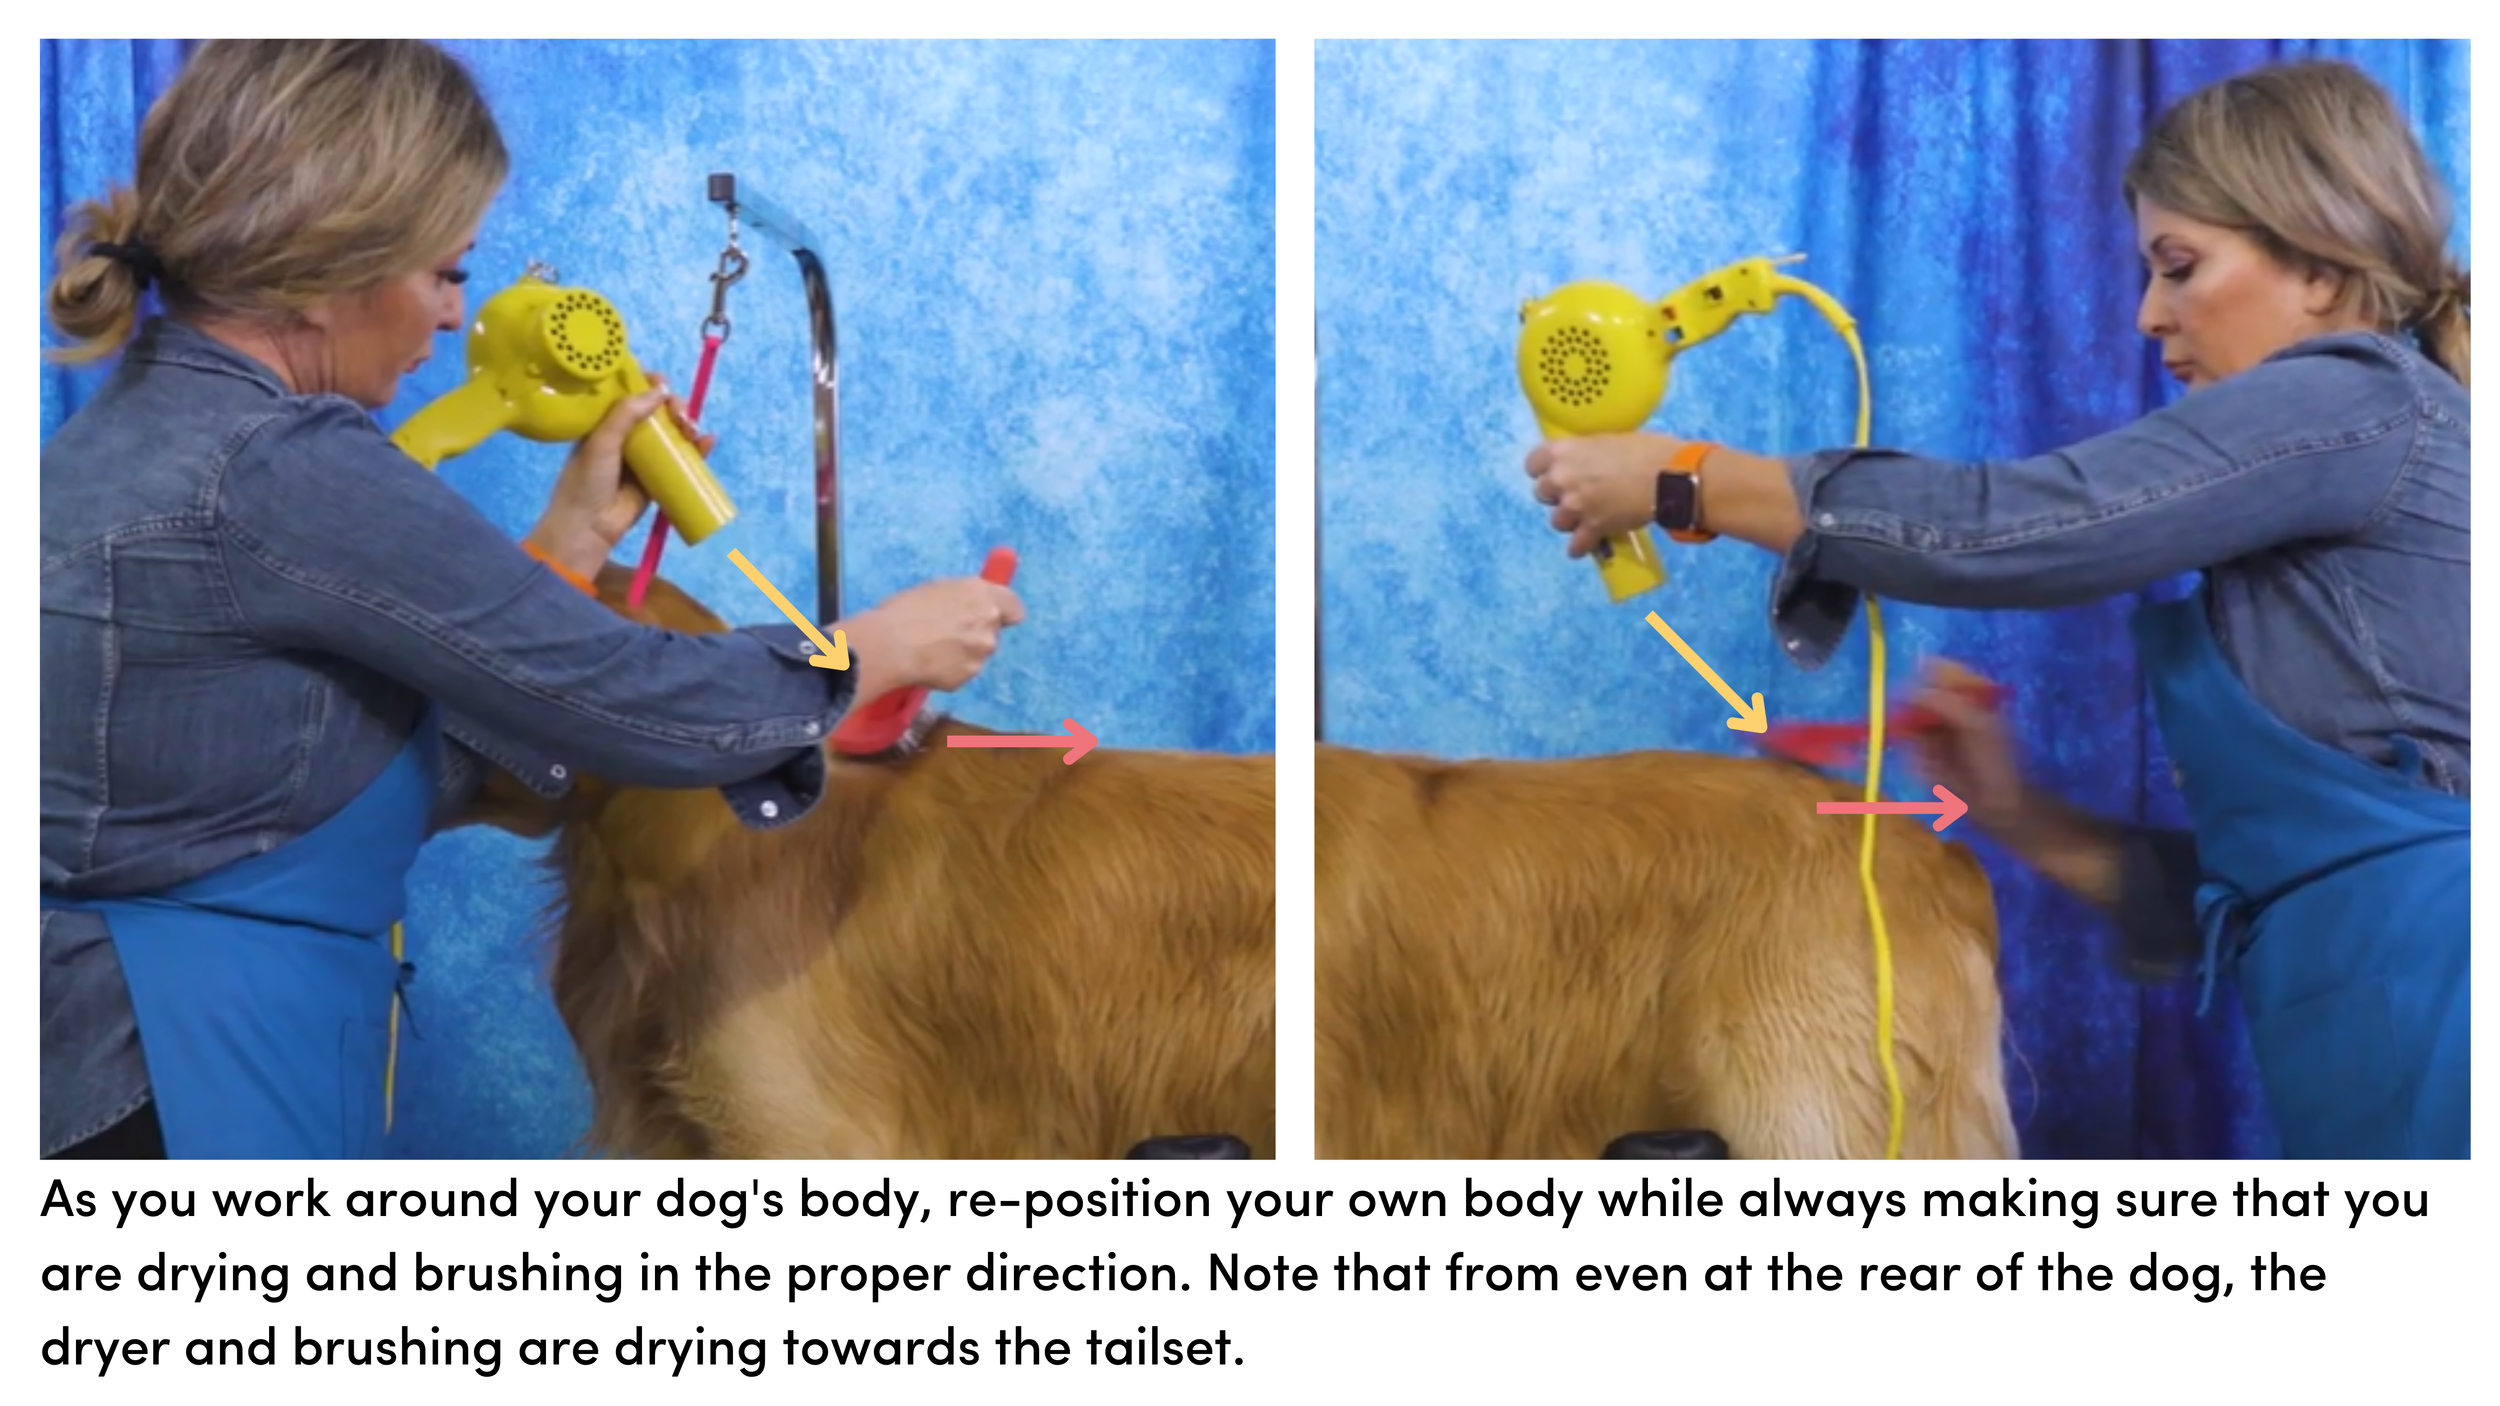
Direction of Drying
MAKING THE DRY LAST
When we talk about drying dogs, we tend to spend a lot of time talking about “making the dry last”. When your dog is fully dry, even after you’ve followed all of our steps and little tricks, there are still things you need to do to make sure the dry lasts. We’re particularly talking about making the dry last for a dog show, these aren’t necessarily things we would follow for a companion dog or for maintenance grooming between shows.
Remember that particularly for double-coated breeds like a Golden Retriever, you also need to avoid your dog getting hotspots! Colds in the tail are also an issue, as is staining.
Your dog shouldn’t go out in the rain, wet grass, or snow. If your dog does need to go out during the weather, you should do your best to find a dry and covered area. If you can’t avoid the weather, you will have to dry your dog when they come inside, or else the coat is simply no longer going to be properly dried (you will have lost all the progress you’ve made so far!).
Your dog shouldn’t wear a collar, a harness, or clothes of any kind. I recommend a slip lead for walking that you take off after the walk.
If you are going to be towelling your Golden, the coat needs to be absolutely dry underneath the towel (you might mist it with some brushing spray but the coat, to the skin, should be dry and not holding any moisture).
For as long as you want the dry to last, your dog shouldn’t play or roughhouse with any other dogs that are going to mouth or chew on the coat.
For bedding, don’t give your Golden a rough bed (even as rough as a towel). I recommend a satin, smooth bed that is soothing and smoothing to the coat. The roughness of a rough bed is going to cause the coat to crinkle.
A lot of people will spend hours drying their dog and then do one, several, or all of these things incorrectly and then their perfect dry is ruined. I’ve had friends go as far as force drying their patch of grass to let their dogs go to the washroom - this to me is too extreme, but there is certainly a happy medium between letting your dog out in the rain and drying the grass. Remember, this is not forever and only to have your dry last as long as you need it to, e.g. for a dog show weekend!
Checking That the Coat is Dry
RAKING THE COAT
RAKING THE NECK DIAGRAM
GROOMING THE FRONT
GROOMING THE THROAT DIAGRAM
TRIMMING THE BIB, UNDERLINE and OUTLINE
Balance Diagram
The Outline Diagram
TRIMMING THE TAILSET AND TAIL
THE FACE AND EARS
SHOW GROOMING
At the show, your Golden Retriever should be clean, dry, and free of any tangles or debris. Do not forget to make sure they have a clean face, eyes and rear!
Follow the steps above for force drying and hot drying - you won’t need to do a full bath at the show, but you can either wet down any dirty or wavy/problematic areas with self-rinse shampoo, or also using the “bucket bath” as demonstrated here. For the bucket bath, use a self-rinse shampoo, or shampoo mixed with water in a spray bottle, to wet the coat anywhere it is dirty or has a curl - this is often where they might urinate on themselves, the hocks, the chest, the tail, the pants, and anywhere on the topcoat that you're having trouble with. It's also a good idea to bath the furnishings to get them looking fantastic! Towel dry your dog and dry according to the instructions above.
Once your Golden is clean and dry, you will move on to chalking and volumizing the legs and some finish trimming, which we'll demonstrate in this section.
How to Towel Your Dog
USING A BUCKET BATH FOR THE SHOW
CHALKING
TRIMMING
FINISHING TOUCHES
MAINTENANCE GROOMING
CAUSES OF MATTING DIAGRAM
DESHEDDING - HOW TO DE-SHED YOUR DOG
Best practices for show dogs have you constantly de-shedding your dog. However, if you have a dog that has/is shedding and has not had a regular routine, this is what you do:
Wash the coat in moisture rich shampoo
Condition with a moisture rihc conditioner, and while the conditioner is on the dog work out as much of the shedding coat as possible (you can use a long pinned slicker for this)
Rinse well and push out excess water/coat with your had
I like to now force dry in the tub as the shedding coat will stick to the wall and be easier to deal with
Protective gear is essential
Try and remove as much coat as possible.can be tolerated by the dog
Dry, brush and comb out excess coat
IN CONCLUSION
We really hope you enjoyed our course on how to groom the Golden Retriever!
If you have any further questions, please email me at allison@leadingedgedogshow.com.
Happy Golden grooming!
Breed Standard at Dogs Australia


