ADVANCED GROOMING TUTORIALS
Spaniel Trimming Basics
Spaniels
When trimming the spaniels it is important to remember that your job is to make them look as short backed and as “cobby” as possible. Everything should work towards the center of your spaniel so that this is where your eye is drawn.
It is always important to think of the breed standard as you are trimming the Spaniels.
Equipment used:
Clippers-Wahl Bravara clipper with the fine adjustable 5 in 1 blade
#10 blade or adjustable blade
Course stripping knife-Chris Christensen Pro Knife
Medium stripping knife- Chris Christensen Pro Knife
Bristle brush- Chris Christensen Ionic series oval
Stripping stone.
Thinning shears- Chris Christensen Adalynn Rose series 7 inch thinner
Steel comb- Chris Christensen 7 inch fine/coarse comb
Short straight shear (for feet)- Chris Christensen Adalynn Rose series 5 inches
Slicker brush- Chris Christensen Big G in medium
Pin brush-Chris Christensen Fusion series oval 27mm pin
The Breed Standard
It is important to commit the breed standard to memory and to have a clear picture of your ideal spaniel in your head while trimming and handling your dog.
To read the English Springer Spaniel breed standard please click here https://www.akc.org/dog-breeds/english-springer-spaniel/
Getting started
When trimming a setter you want your eye to go “from the nose to the toes” as they are a longer cast dog. With Springers or Spaniels in general you want your eye to be drawn to the center of the dog, as they are a shorter bodied dog. English Springer Spaniels in North America have become more glamorous than their counterparts from across the pond. It is important to remember this as well trim our Spaniels.
Before You Clip
Clipper-work.
Starting the trimming of the spaniel it is always best to start with your clipper work as then you have a starting point for all the other trimming methods to come from.
Starting with a #10 Blade.
Before you begin clipping your spaniel it is a good idea to run a brush through all of the areas you are about to clip. This will clear the way for the clipper blade and you will get a cleaner look in an easier manner this way.
Clipping the throat
Using a #10 blade
Remove the grooming loop from the dog. Start under the chin and clipper down the center of the throat going with the grain of the hair. The end point is where the neck starts to curve into the chest. This is your stop point. It is important when viewed from the side that the transition from neck to chest/bib be smooth and even.
Now clipper along the jaw line (but not above the jaw line) all the way to the cowlick in the ear. You will follow this line down clipping from the center of the throat out to the cowlick on either side of the neck. When you are done when viewed from the front you will have a “V” shape of clipper work.
When this clipper work is all done you will see that up until now you have been following the natural lines of your dog. Now go again the side of the neck and starting at the ear clipper down the outside of the “V” essentially taking off the cow lick and starting your own line from which to trim from. Remember that your clipper work is ideally done a couple days before the show so any areas that may be too short (especially on a coat that is being trimmed like this for the first time) will have had time to fill in by the show. This is another reason you are using a #10 blade.
Clipping the Lips
Next you want to clean out the lips of your spaniel. Spaniels have deep lips and it is important to pull back the lips at the corners of the mouth and make sure the little grooves along the bottom lip line are nice and clean. This may take a couple passes of the clippers. When clipping the top lips you are still using a #10 blade but you don’t want to dig right into the coat. You are just grazing the hair in this area to take the whiskers off. You are also going down and around the outside of the lip or “flew” to make this area look neat and clean and tidy. This technique can be a bit tricky and your dog’s reaction can affect the outcome. Remember practice makes perfect.
Once you have ensured that both sides match you are done the basic clipper-work for the neck and throat.
Clipping the ears
Starting with the ear from the top of the ear you clipper down going with the grain of the hair start cleaning the ear hair off. You will clipper down the length of the ear between one third and one half of the total length of the ear. The amount of hair you trim off will depend on how long the ear leather is as well as how much ear feathering the dog has. Use your interpretation of the standard to determine this. You NEVER want to go into the skull as you with use a stripping knife and thinning shears in this area later to get the desired effect. Be sure to clipper off the front fringe of the ear feathers. You want the ear on your spaniel to appear as low set as possible and it is important to take all the hair off the clippered portion of the ear to get the desired effect. Flip the ear over and clipper out the hair on the inside of the ear. Keeping the inside of the ear leather free of hair actually helps keep the ear more hygienic. When clipping the inside of the ear, with the ear leather flipped back you will notice a line of hair, this is actually ac cowlick and I start my clipper work at the line and clipper straight back to the inside of the ear.
The Jaw Line
You will have a clippered line that runs along the jaw line then gently curves upward to the top inside corner of the ear.
Starting on the Jacket/Topcoat
The jacket is all the hair on the top of your spaniel. The hair that does not drop down and form “feathering”. The Jacket is referred to as “topcoat”.
Once the clipper work is done it is time to start on the jacket. Using a bristle brush brush all the topcoat in the direction that is grows. You will brush quite firmly getting the hair to start going in the direction you want. Then using your coarse knife pull the skin at the top/side of the neck neat the skull taught and start to “card” or strip out the undercoat in this area. You are using a ‘raking motion” and you want to always pull the skin taught so that you do not risk catching your dogs skin as this is uncomfortable for the dog. As you finish with the neck you keep working down your spaniel’s body all the way to the tail. Too many people forget to strip out the top of the tail and this is a mistake. Remember when working towards the tail to be aware of your dog’s tail set. Some spaniels need a little build up of hair in this area. This is where you use your interpretation of how your dog fits the breed standard.
Look at your spaniel while you are carding out the undercoat. Note the pattern that the jacket makes as it gives away to the furnishings. You are just bringing definition to this natural coat pattern.
You are always working towards trimming your spaniel so that it looks short backed. That means you are taking the coat at front and the rear of your spaniel as tight to the body as possible.
The next step: Using the Stone
Once you have raked out all of the undercoat out of your spaniel you are ready to start using the stripping stone. With the stone we are not raking the coat again. Use a corner of the stone and your thumb and starts stripping off some of the topcoat pieces that are sticking up and making the coat look unkempt. The goal here is to make the topcoat look neat and tidy and like it is tight fitting to the jacket of your dog.
Thinning Shear work
Now using your thinning shears go the side of the neck of your spaniel. Holding the head up start at the bottom of the “new Line” you clippered and take off the overlap of hair with the thinning shears. Pointing the thinning shears straight up you take off all the hair creating a nice neat line. You can see no why we start with the clipper work so that we have a place from which to start and finish our lines.
It will take several passes of the thinning shears to make sure that this is completely and properly done.
Shortening the hair with Thinning Shears
Now it is time to de-bulk and neaten up some of the excess coat with thinning shears. We call this “modified scissoring”. Years ago most people and today there are still some that when they scissor they go up and under the coat to de-bulk the coat. This is not effective and often causes some long-term problems with this cut hair starts to re grow. The way we do this now is we shorten the hair. We use the comb as a guide and hold the hair up as we follow along at the top edge of the comb and shorten the hair with the thinning shears here. This method does take practice and coordination but it is well worth learning the skill once you see the finished result.
The first line where we use this method we are following the line of the neck and shoulder. Remember to comb and brush between passes of the thinning shear to make sure you are not making any holes and to watch the progression of your work. It is important that your setter remain standing during this part of the trimming as the lines will totally change if your setter in sitting.
Defining Neck and Front Leg
Using the medium stripping knife go over the sides of the neck pulling off all the excess untidy hair. You will alternate between the stripping knife and the stripping stone. Different coat types will dictate which of the tools will work the best.
Once you have the front of the shoulder and the sides of the neck looking the way you want lift up the front leg and continue pulling hair of the top of the front of the leg to make the leg look more set-under the body when you are finished. Too much hair here will not only look untidy but it can make your spaniel look like their front legs are set too far forward. (Note your spaniel can sit while you are trimming the front of the front leg). Continue down the length of the front leg pulling off stray hairs to make the entire leg look neat and tidy. When you take the excess long hairs off the front of the leg it is easier to build up the leg hair at a show.
At this point when your spaniel is standing up you can see how this trimming technique makes your spaniel’s front leg look well set under. As well you can better see the shoulder layback and the return of the upper arm. Go over the trimmed area with the brush and the comb to check for excess hair that may need to be removed.
**Pro Tip** When drying your spaniel, especially the front leg and shoulder dry all the hair back towards the tail of your dog so make this look easier to achieve. As well you are starting to train the hair to go in the direction that is most appealing for the show ring.
Flatwork
The shortening of the hair on the front and rear of your Spaniel we refer to as “flatwork”. When trimming the front and rear of your Spaniel you want this hair as short or as “flat” as possible. You can use the thinning shears extensively in this area. When working on the jacket or topcoat you want to use a stripping knife and stripping stone to help preserve the texture of the coat in that area.
Remember you are always trimming to show the bone structure of your dog, or what the ideal bone structure of your dog could look like.
Leg Ratio and it's importance
It is important when trimming any breed to keep the breed standard in your mind at all times. When trimming your spaniel always be aware of what the correct leg to body ratio is. You do not want your Springer Spaniel to look low legged. This will throw off the “square” look we are trying to achieve. When trimming the front you can always strip more hair off the top and the sides of the elbow to not only make the leg look longer but to also make the front leg look like it is set under the chest at the proper place for correct layback of shoulder.
**Pro Tip**
I often switch between stripping tools as I am trimming. The stripping stone can often give more of a “finished” look to the work that I am doing. Always remember to brush as you are trimming so that the coat lays in the direction you want it to grow and also so you can see what you are trimming off and avoid making holes in the coat.
The Head and Neck
Preparing to trim and strip the coat that is the transition between the neck and the skull you will brush the coat several times in the direction you want it to grow. Next using the stripping knife and your thumb start to de bulk the coat on the sides of the neck. Remember to always pull the skin tight where you are stripping the coat to avoid catching the skin with the knife.
Scissor Work
Once the undercoat has been raked/carded out of the side of the neck and then brushed in the direction you want to hair to grow you are now ready to tidy up this area. We will use the modified scissoring technique where we use the comb to hold up the hair as we shorten the coat in this area. Start scissoring about half way up the neck, on the side of the neck right behind the ear. As much as possible use a continuous movement with the comb and scissors and shorten the hair all the way up to the base of the skull. You will actually go up the base of the skull BUT NOT ACROSS THE TOP OF THE SKULL. You will also use this technique as you go around the top of the ear. You are now blending the clipped part of the ear into the skull portion but again do not go across the top of the skull with this technique.
The Head
You never clip the top of the skull.
Using the medium stripping knife you will start pulling the hair off the top of the skull using the knife and your thumb. You are pulling of the stray and untidy hairs; you are not pulling off all the layers of hair. Brush frequently between stripping passes to be sure that you are not stripping too much hair and creating holes in the coat.
From front to back you are stripping from the brow bone to the back of the skull where the scissor work ended. From side to side, if you had an imaginary line from the corner of the eye to the corner of the ear you are stripping from one of these lines to the other but always in that front to back method.
Once the head and skull are stripped out and brushed you are now ready to do some fine-tuning with the thinning shears.
Fine tuning the head
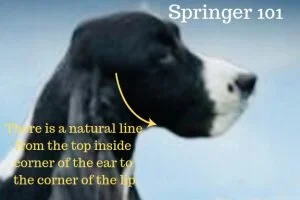
Using the thinning shears you will scissor off the clipper line from the jaw to the top inside corner of the ear. This takes some finesse, as you do not want to create any holes here. Rather you want to make the sides of the head look seamless. There is a natural line from the top inside corner of the ear to the corner of the lip. You are scissoring this line so that it blends into the rest of the head.
Now it is time to look at the head and the face with a critical eye. Use your thinning shears and your stripping stone to take off any little hairs or distractions.
You want the head to look neat and clean. The head should have a nice low set ear a tight lip line, no flap on the front of the ears and nice brow definition.
The Rear
At the rear of your spaniel you will start the flatwork from under the tail along the back of he back leg. Using the knife and your thumb pull the hair hear tight to the body. Remember to brush between stripping passes to make sure you aren’t creating any holes in the coat. You may have to adjust the amount of hair on the topline of your spaniel as you tighten the rear coat to make sure everything stays looking balanced. Always be aware of the tail set and do not pull too much hair out from in front of the tail so you can build the tail set up as needed.
**Pro Tip** When stripping hair in areas that are always in front of the judge’s eye you will find that the stripping stone is a little more forgiving. The Stone will crumble and break before you will actually cut the hair. I prefer to use the stone in areas where the coat is already damaged and also in areas where a cut hair would be more apparent.
Scissoring the Rear
Using your thinning shears trim off all the hair around the anus. Then holding the tail in an upward direction. Follow the cowlicks up and under the tail and scissor off the hair from under the tail until only a short covering remains.
Now you are ready to go back to the back/side of the thigh where you were raking and stripping the hair and using the scissor/comb technique shorten this hair as much as possible without leaving any holes to create the rear flatwork. Always brush between passes of stripping or scissor work so you can see how much more hair needs to be removed.
The tail set
The tail set is very important as it affects the overall look of your spaniel’s outline when viewed from the side, the overall look of the top-line while your spaniel is on the move but also the look of the rear when viewed from any angle.
When trimming into the tail-set from the rear of your dog go in on an angle so you can make the flatwork look as short as possible while at the same time reserving some hair in front of your dog’s tail for trimming in the tail-set.
The shorter the hair is at the rear of your dog the shorter your spaniel will appear and your eye will be drawn into the center of the dog.
Now scissor in the pin bone of your spaniel up into the back of the tail. Follow the body contours of your dog as you do this.
Body Shape
Stand back and look at the overall outline of your spaniel. You want to pull hair with your stripping stone and thumb that allow you to define the body shape and bone structure of your dog. Remember that we are going for the IDEAL body shape and bone structure.
Hocks
As the hock is very much a part of your spaniel that can make them look longer than square it is now time to trim the hock into the body shape.
You want the hock to both look low and not long hocked. As well you want the hock hair to help with the overall look of your spaniel’s angulation. Start with the back foot at the back of the table. You are using the thinning shears and NOT straight scissors. Brush all the hock hair out with your slicker brush. Get on your knees so you are at eye level with the hock and can better see the lines you are creating. Be sure to trim all the way around the hock trimming both the inside and the outside of the hock. You are trimming a basically straight line from the back of the thumb pad to where you want the hock to appear nice and short.
With Spaniels it is important to make sure that the feathering on the pants do not over power nor hang too low cover the top of the hock. You want the coat on the pants to meet the top of the hock. Use the stripping stone and your thumb and carefully pull some hair until the desired look is achieved. Remember to brush and comb between passes of stripping to ensure you are not removing too much coat. This is your interpretation of the breed standard. Once the hock is trimmed you must remember that once you use chalk and cholesterol at the dog show touch ups may be needed.
Understanding the Underline
It is very important to remember especially with Springer Spaniels that the more furnishings we have growing down the lower we make our spaniel look. The lower they look the longer backed they look and that means we no longer have a square looking spaniel.
When trimming the underline on a Springer Spaniel always try to bring the underline up enough to give the dog the appearance of leg. We call this “giving some daylight under our dog”.
The higher stationed our dog looks the shorter back they will look.
From the rear of the dog you will start the underline about halfway up the dog’s hock. You do not want the hair to ever hang below halfway up the hock. Use your thinning shears to start this line.
Working up into the loin and the “tuck up” it will take several passes of both shears and comb to perfect this line. This is the first trim of the underline. Once the dog is re-bathed and the coat is blown dry straight you will have to do finishing work to get the desired effect for the show ring.
Trimming any part of the dog is not an exact science. It is art and your interpretation of the breed standard. The basics are the same but it is the “eye” of each individual groomer that defines the finished product.
Now cut from the knee area up into the “tuck up”. When trimming into the tuck up you are looking to make your setter look balanced. The tuck up should land where your setter’s waist is or where you want it to look like it is. It is very important to have a clear idea of where you want the tuck up to land before you start into this area.
Trimming the Underline
You will now start a line from the elbow that is a straight line up into the tuck up that you have already trimmed. When starting this line you will have to life the front leg so that the underline actually starts from underneath your dog. You are aiming to make your setter look atomically perfect. Make sure that your lines are straight and not round. There are no round lines on a setter. You will have to make several passes under your setter to make sure the underline looks neat, tidy and straight.
The underline MUST connect with the bib in a continuous line that goes under the front leg. If the bib is broken or damaged you may have to shorten your ideal underline to make this area look balanced. If the bib is undamaged then you have the artistic license to make the bib and underline look as fancy as possible.
the Front Leg
You will now want to match the line of the furnishings on the front leg to almost match the underline.
Lift the front leg and with thinners, trim the hair from the thumb pad, and that will start the line for the furnishings. Put the leg down and you can see how much hair you need to remove to match the lines. Be sure to keep the lines as natural as possible.
Finishing Touches Make All the Difference
Finishing the Topcoat
Use the stripping stone for finishing the topcoat. The stone is a little more forgiving than the stripping knife. When grooming a liver Springer you would not be quite as aggressive when stripping the topcoat as liver coloured dogs are more subject to colour change when there is an error made in stripping.
With a Black and white Springer you can be more aggressive and not worry about colour change.
Always pull the hair in the direction that you want it to grow. Keep spinning the stripping stone in your hand. This gives you a nice clean edge to keep working with.
Pay attention to the topline and make it look nice and neat and level. This is where you must use your interpretation of the breed standard along with your assessment of the dog that you are grooming to get the desired effect.
Pull off all loose and untidy hairs and keep working the topline until it looks perfect.
**Pro-Tip** at this point it is important to have someone take your dog for a short walk or “down and back” type trot where you can see the topline of your dog and adjust the grooming as necessary.
Remember that the when the dog is re-bathed and blown dry there will still be some tidying up to be done.
Finishing the Ears
The ears should look neat and tidy at the ends but never look “bobbed”. To get this look comb all the hair of the ear fringes down and take the very bottom and twist the hair. Then using your thinning shears just trim off the thinnest of the hairs in the twist. This will give you a nice neat looking ear without making it look too blunt.
Conclusion
The basics we have shown you here will work as a foundation for many of the other spaniel breeds. Obviously the American Cocker Spaniel would have their profuse coat trimmed much differently but the work on the topcoat and the neck would be similar. Stay tuned as we bring you more in depth courses on the other Spaniel breeds.
