MASTERCLASS
Newfoundland
with Allison Alexander
Equipment Used
Grooming Table
Grooming Arm
Grooming Loop
Artisan thinning Shears
Artisan 5 inch Straight Shears
Mystic Ear Ear cleaner
Clean Start Shampoo
Black on Black Shampoo
After U Bathe Conditioner
Wide Tooth Comb
Coat King Coarse Stripper
Gel
Black Ice Spray
Shine for Sure Spray
Big G Slicker
Fusion 27mm pin Brush
Newfy Part 1 - Setting Up for Success and Bathing your Newfy
As Newfoundland’s are a large, heavy breed it is important to get your puppy used to a grooming table as soon as possible. A heavy table that is lower to the ground than an average table is preferable. The typical height for a grooming table is about 30 inches tall, preferable height for a table for your newf would be 24 inches. If you already have a taller table or are unable to purchase the 24 inch version cutting the legs off at the preferable height is an option many people use.
When using a grooming loop it is never tight around the dog’s neck. It is there to remind your dog to stay on the table. Never leave a dog unattended on a grooming table especially when using a grooming loop.
Now take an overall look at your dog, note where the hair is short or thinning, either from damage or from shedding and also look at where the coat is thicker, heavier and longer than is desired.
Bathing
I use Chris Christensen Clean start shampoo as it is a clarifying shampoo and Newfs tend to have a heavier, oilier coat and clean start gets them really clean. Next I use CCS After U Bath conditioner. I use it diluted 8 to 1 and I mix it with an immersion blender to get it mixed really well.
After bathing and rising I use the conditioner on the entire dog (it will take 2-3 liters of diluted conditioner per bath) After U Bath is a light conditioner AND it seals the cuticle which helps repel dirt and dust and more importantly cuts down the drying time by about 30%.
After bathing and conditioning I am going to squeeze out as much water as possible with my hands. Always starting at the head and moving towards the tail and from the top of the dog and working my way down. Then I will repeat the process with a towel after carefully drying the dog’s face and wiping around the eyes and ears.
Now I put my dog in a clean, dry area to shake off as much excess water as possible and to also make sure that they are relaxed after the bath. This area could be a dog run, laundry room, back deck or grooming room. It is scientifically proven that letting your dog shake does remove some of the excess water that towel drying alone will not remove.
While the dog is shaking I will prepare the table by putting down two clean dry towels. These towels will help catch the drips and also help dry the feet. Newfs are big dogs and the more ways you can help absorb the excess water the better. Having the two clean dry towels helps get the feet dry faster.
Now you are ready to start drying. With your dog on the table use a force air dryer/high velocity dryer. We have sued the CCS Xtreme II dryer. Always start from behind the head and work towards the tail and then from the top of the dog (topline) down the body. Do the legs and the feet last. Water is always being pulled down the body. Do not start drying in the middle of the body and then go up as the water from the topline will just work its way down to the dried area getting it wet again. This will spoil the final outcome.
I do not dry the head and the ears with the force dryer. I do towel this area as much as possible and then I “fluff brush” with a pin brush where I am trying to get as much air as possible into the coat and I style it to air dry. I usually dry the head and ears last UNLESS there is a cowlick or very unruly hair there. I do ALWAYS style it with a brush to train it as it air dries.
Direction to dry Newfy Front, Body and Rear
Newfy Step 1
Summary of Step 1
Now that your Newf is completely dry it is time to stand them up and take a look at their overall outline. This is where you will start shaping that coat to give your dog your vision of what you want them to look like.
Your dog needs to stand for this process and in the video we had to use a belly band to help our model remain standing. Take into consideration how the belly band is affecting their outline.
Newfs should look slightly longer than square and never appear leggy. This is important to remember when trimming as we do not want to groom in faults that our dog may not possess - we DO want them to look neat and tidy. This can be a delicate balance with a Newf.
Using a wide tooth comb and a course Coat King type rake completely comb out your Newf. Then critically look for areas that look “heavy” or out of balance. (we are looking at coat only not conformation).
Use the Coat King by “raking” the coat in the direction you want it to grow. Never go against the grain. As a general rule after 5 or 6 “rakes” I comb the hair to see how much has come out. This way you do not get bald spots. Remember if you remove too much coat that it will grow back!
It will take several passes with combing in between to get the desired look. Keep moving for area to area and then going back to create the balance you desire. For very heavily coated dogs it may take up to three baths/grooming sessions to get the desired look. Keep combing/raking and looking at the overall balance.
Just like mowing a lawn you cannot just take one strip of hair out and think that you are done. You need to go over the area line by line, with the lines barely overlapping to get te desired affect. Newfs are big and there is a lot of dog and hair to deal with. Be aware that a Newf may get tired especially if they aren’t used to the grooming and give them breaks as needed.
The Ears
Newfy Ears
Whether at home or in the show ring the ears are such an important part of the overall expression of your Newf.
The ears should be trimmed to look neat and tidy and sit close to the cheek. The ear should always be trim so the tip looks rounded and not pointed.
Using thinning shears lift the ear up and trim out all the hair around the ear canal. This allows the ear the breath, makes it easier to clean and also stops that hair from lifting the ear away from the head when you are done. Many people can trim the ear but when they omit this step the ear does not sit properly on the cheek and ruins the overall expression of your Newf.
With the ear still lifted use the thinning shears to remove the bulk of the hair on the cheek that the ears covers up when the ear is down. So let the ear down, look at the hair on the cheek that it covers and thin the hair out here until the ear sits forward and how you like it. I like to take two or three passes with my thinning shears, combing and dropping the ear in between until I get the desired look. On thinner coated dogs or dogs who are blowing coat or still coming into full coat you may take very little hair out on thicker coated dogs in full coat you may be taking a lot of bulk out in this area.
Once the bulking out is done you are ready to trim the outline of the ear.
Carefully comb all the ear hair out and down and then simply follow the outline of the ear leather with your thinning shears cutting off all the wispy and straggly hairs to make a nice neat ear.
This is where your interpretation of the standard comes into play. If you think your Newf has a small ear then follow the outline leaving the hair a little longer on the edges of the ear leather. If you think your Newf’s ears are too large trim the hair closer to the ear leather. In all cases I like to trim at least the bottom 20% of the leather quite close to the leather to give it a neat appearance. I use my thumb as a guide always trimming close to the leather and making this part neat, tidy and round.
Next hold the ear where you want it to be in the ring when showing expression. Comb all the hair down and then blend the hair from side to side and from top to bottom. You are making the hair look tidy and plush. Balance the amount of hair your dog has on the ear with the rest of the body coat.
Lastly, with the grooming loop acting as your show collar (make sure it is up where the show collar would be in the ring) Hold the ear straight up and trim the ear hair off on the back of the ear so that it does not interfere with the collar.
Grooming the Head
The Newfy Head
When grooming the head of your newf keep in mind that this is the introduction of your dog to judges and indeed anyone who meets him! The head should basically be round in shape with the ears fitting in nicely to the overall outline and not hanging down and looking “houndy”.
It is important the ears are trimmed before you trim the head.
Next comb all the hair on your Newf’s head from just slightly behind the occiput towards the front of the head. The amount of coat your dog has on the top of the head can vary greatly from very little that needs just a little tidy up to Newfs that have a big fluffy wig up there. Newfs should have a nice “rounded” and full skull.
Using thinning shears you will trim from ear to ear in a rounded shape. NEVER dig your shears into the coat. You have a great opportunity with the top of the head to really leave the desired amount of coat up there to create a rounded skull and that iconic Newfoundland expression
Trimming the Front Legs
Trimming the front legs of your newf is a three step process. To begin you want to have your dogs legs brushed out and shake the leg and the coat out so it mimics your dog moving in the ring and then coming to a stop in front of the judge.
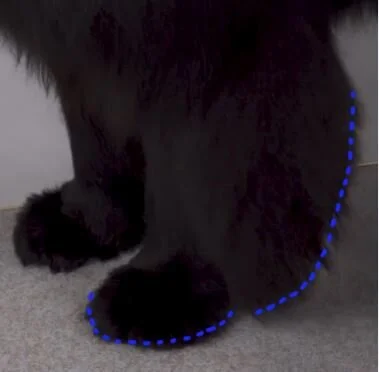
Where the leg hair is sticking out or “poofy” at the side of the leg can create the optical illusion that your newf is too wide fronted. Start with your coarse Coat king type rake and take out the hair going straight back from the front of the leg to towards the rear of the dog. After 3-5 “rakes” comb and re fluff to get the natural look again and continue all the way down the leg, fluffing several times until when viewed from the front the leg hair does NOT extend past the body line of the dog. (see diagram)
After the side of the leg is raked and combed to perfection it is time to trim the foot into the bottom of the leg hair. With your newf standing 4 square you want to use thinning shears and cut a gentle line from the foot to the leg hair at the pastern. It is not a sharp angle but rather and gentle curve from the back of the foot into the leg hair. Comb several times and go over the trimmed part to make it nice and neat and tidy.
The leg hair at the bottom back of the foot should only be about a finger width off of the floor when your dog is standing in a stacked position.
Newfy Front Legs
Now, Trimming the Front - From the Front
When grooming the front of your Newfoundland it is important that your dog is standing up. The entire trim will change if your dog is sitting while you are trimming the front.
First Step, with the collar right up under your dog’s chin, use your coat king in the direction that the hair grows and create a little “nest” or indent about the size of your handby stripping away excess coat here. You want an area about half of the thickness of the chest here directly under the chin. This gives definition to the under-jaw, makes your dog’s head and neck look better, provides a place for the collar to sit, allows the collar more freedom while moving and helps create a better overall outline when your dog is viewed from the front.
When trimming the chest hair from the front of the dog it is important to remember that the bottom of the chest hair never ends in a straight line. The line comes down off the shoulder to almost a point at the bottom and then right back up to under the opposite ear. Once the line has been trimmed and combed and trimmed again several times gently round the point.
Shake the coat several times to mimic the dog moving in the ring. The line of the chest should always look rounded.
Trimming the Front Legs of the Newfy - From the Front
The Rear Leg and Hock
When trimming the rear we want to see the angulation of the rear and show off, or create a nice low set hock. To begin use your coarse coat king and strip out excess coat on the rear and sides of the back leg until you have a nice smooth outline. You want to be able to see the angulation without it looking over groomed.
As you strip out the coat remember to go in direction that the hair grows. Also provide some movement into the coat mimicking how the coat would behave if your dog was moving in the ring. Look at the coat and strip out more where it isn’t blended or is creating a lack of balance.
Once you have balance and smoothness to the back leg you are ready to trim the hock. Start by combing all the coat on the hock straight out behind the hock. Using thinning shears stand your dog on the back of the grooming table so that the hair of the hock is coming out past the end of the table. This is the easiest way to “get at” the hair and trim it evenly. Before you start trimming be sure that you have the coat from the pants out of the way. You do not want to trim this coat as part of the hock. The coat on the back of the hock is trimmed from the top of the hock to the floor in a straight line 90degrees in relation to the ground.
Keep combing the coat and scissoring with your thinning shears until the hock is neat and tidy and has the look you are after.
You will then blend the very bottom of the hock into the back of the foot on about a 10 degree angle.
Once you have the back of the hock trimmed you need to work the coat at the side of the hock so that it is neat, tidy and blends into the hair at the back of the hock. The hair on the hock will look almost cylindrical.
Then blend the coat from the hock into the foot. You do not want coat flaring out on the side of the foot. It is better that the foot is trimmed straight into the hock. When viewed from the rear of the dog any coat that flares out will create the illusion that your dog is cow hocked. If your newf is slightly cow hocked careful trimming in this area can create the illusion that the dog does not have this fault.
Newfy Rear Leg and Hock
Untrimmed Newfy Hock
The Topline
Newfy Topline
The last thing to groom is the topline. The topline is so important. It is the most important aspect of your newf’s overall outline both standing and moving.
Using your coarse coat king rake you will critically look at your dog’s topline. Does the neck appear long enough? Is it too bulky? How does the hair from the back of the neck blend into the withers and from there to the middle of the back. Often newfs have a lot of “booty” coat that can make them look high in the rear and out of balance.
You will spend a lot of time raking the trimming the topline. It is important that you rake out the ENTIRE butt of your newf and keep shaking the coat to mimic what it will look like after your dog has run around the ring and stopped.
Now it is time to ideally have a friend or handler move your newf and then stop so that you can see how the hair acts. Take your coat king and rake out any areas where the hair is not smooth and tidy looking after moving.
Once this is done the last thing you will do is smooth out all of the coat with your pin brush. Stand back take a last look. You can also add some shine for sure at this point to make the coat shine and tame the little fly-away hairs.
The Underline
Remember that the Underline is a continuous line that goes all the way under your dog.
When trimming your newf remember they are a big dog with a lot of coat and a lot of area to groom! Your dog might need a break even before you do and by letting your dog have a rest break they will probably be more co operative and your results will be better.
The underline should be slightly rounded and connect the chest, under the front leg, the tuck up, and the rear leg altogether in a seamless line.
When trimming the underline remember the newf should not appear with short legged nor leggy. It is a delicate balance.
Your newf must stand four square, as if they were in the show ring when trimming the underline.
Using your thinning shears first trim the straggly hair at the front of the front leg opposite from the elbow. This will accentuate your dog’s shoulder angulation and as well create definition at the top of the leg. This is also an area where you can slightly adjust the illusion of where the top of the leg actually is by trimming.
Starting with the curve of the chest hair trim the hair so that is sweeps down into the front of the front leg, continues under the front leg. From the back of the front leg to the flank this is a nicely rounded NEVER STRAIGHT line. You are not creating much of a tuck up. If you have a male newf and it has coat loss in the tuck up area do to dryness (usually caused by urinating on the coat all the time) your trimming could look like it has a more extreme tuck up than you would like.
You should add extra conditioner or try deep conditioning the coat in this area if your dog has coat loss there. The finished look will be much more desirable with better coat in the tuck up.
Be careful that you do not over compensate and trim up into the tuck up if there is coat loss there, you will create a look that is too extreme for a newf.
When trimming the underline on a well balanced dog often less is more and trimming a few straggly hairs will make the underline will look neat, tidy and polished without looking over trimmed or straight.
The Tail
Newfy Tail
Before trimming the tail look critically at your dog and where they naturally carry their tail when in the ring. Do they carry it up and over the back? Straight out? Down? All these things help you determine how you will trim the tail.
Trimming the tail is basically neatening it up. You want it to look tidy in the ring when your newf is wagging his tail. If the tail is a little short leave a little more hair on the tip and an overly long tail could have the hair on the tip trimmed quite close to the end. Remember the tail is the rudder of the newf and should never appear lacking in bone or substance.
To begin on a heavy coated dog I like to create a “nest” for the tail to sit into. This helps make the overall outline of the newf appear neat and tidy and like it flows together better. Just like we trimmed the cheek hair to let the ear sit in the proper place creating this nest does the same thing at the other end.
To do this hold the tail and the tail hair to one side and using the coarse Coat King rake the hair on wither side of the tail just under where the tail naturally sits.
This also helps give definition between the tail and the topline, showing off the proper tail set.
Now holding the tail straight out from the body brush and comb the hair down and then shake the tail so that it looks natural. Then using your thinning shears just tidy the coat. Remember it is the rudder and should never look brush like or over groomed.
Trimming the Feet
Always trim the Newfoundland’s feet while they are standing. Step one is to scissor the hair on the bottom of the feet even with the pads or shave out in between the pads. Use a #10 or #15 blade or the Wahl 5-in-1 adjustable blade on the middle setting.
When you are trimming the foot the dog should ALWAYS be standing, even when trimming the front feet. The foot takes on a completely different shape when the dog is sitting down. The top or fronts of the feet are always done with thinning shears. Trim the foot so that it looks large and round. Newfoundland’s are a swimming breed and you want their feet to look strong and like they could move a lot of water. Do not take too much hair off from between the toes as you can make your dog look splay footed. Do not expose too much of the toenail. The feet should look neat. Tidy, round, large and strong.
Prepping the Legs for the Show Ring
Before going into the ring prep your Newfoundland’s legs to look big, solid and like they have a lot of bone.
First use some self rinsing shampoo or water and slightly dampen the leg. Towel dry and brush all the leg and foot hair up and against the grain of the coat. Brush any hock hair straight out from the hock and brush the feathering on the back of the front legs straight back towards the rear of the dog. Going one leg at a time put a generous quarter sized dollop of gel in your hand, rub your hands together to warm up and emulsify the product. Then starting at the toes go up and against the grain through all of the short hair rubbing the gel always against the grain of the coat. Do this on all four legs. Then follow up again with the slicker going up and against the rain. If your dog is lacking bone or is blowing coat you can add several layers of gel until you get the desired effect. Before ring time you can always refresh this with a light mist of water and another pass against the grain with the slicker brush.
You can put a small amount of get in the hocks and brush them straight out and a small amount in the furnishings of the front legs and brush them straight back and down.
Prepping Show Legs on the Newfy
Conclusion + Tips for the Ring
When showing your Newfoundland it is important to remember that no judge likes to be drooled on! Be courteous and have a drool towel or some way to clean up your dog’s drool while in the ring.
Having the collar up and in the right place will not only help you show proper head and expression, show off length of neck, show off front angulation but is also imperative for you to have proper control of your dog at all times.
Brushing in the ring is not necessary but will help your dog look neat and tidy at all times. Over grooming in the ring will not be tolerated.
When stacking your Newfoundland you are going to use the hair on the elbow INSTEAD of the elbow. This is because Newfoundland’s are a heavy bog boned dog it is hard to properly hold the elbow.
It is very important to have control of your dog’s head while stacking. Keep the dog’s head in a nice straight line in relation to the spine.
Stack the back legs by grasping the front of the hock and stacking the leg so the hock is at a 90degree angle to the floor. When stacking the rear be sure to quickly smooth down any and all hair on the dog’s butt and top-line that you have disturbed while stacking. This should be practiced so it looks like it is a fluid movement and not like you are grooming.
When you have finished stacking make sure the collar is still in the right place and that the ears look alert and are pointing forward.
Newfoundland’s are an athletic breed and your conditioning at home should reflect that.
It takes a lot of practice to get a dog to stand up and hold his body correctly but it is a beautiful sight when done properly!
Newfy Conclusion
Breed Standard at Dogs Australia


